
Detailed guide
In the following guide, we will show you step by step how to configure your corporate email with Outlook on your mobile phone. First, you must have a registered domain and the contracted email service. At CEODATA we offer the corporate email service for FREE for one month. You only pay if you like our corporate email service that can be configured with Outlook or any other email manager. If you don’t have your corporate email on your mobile phone yet, contact us via WhatsApp by clicking on the icon on the bottom right of your screen, or go to https://ceodata.io/correos-corporativos/ to see more details and hire a powerful corporate email service.
Step 1: Download Outlook from the Play Store or App Store
From your Android phone, enter the app Play Store or from your iPhone, go to App Store. Search for the “Microsoft Outlook” app, download and install the app on your mobile phone:

Step 2: Open the Outlook app
Once installed, open the Outlook app. The following screen will open (Click on Add account):

Step 3: Enter your corporate email address:
The next screen will allow you to enter your personal corporate email address. Enter it as shown in the image. For this example, we will use the domain arriendoplaya.cl. The account we will configure is hello@arriendoplaya.cl (You must change this account to your own). Once you have entered it, press the “Continue” button:

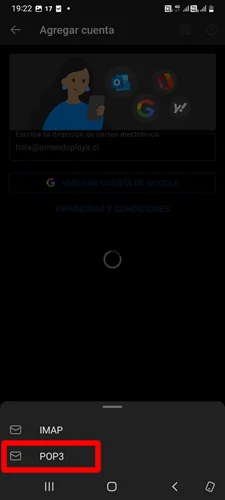
Step 4: Select POP3
On the next screen, it will ask you for two options. Choose the POP3 option:
Step 5: Incoming Mail Configuration
On the next screen “Connect to POP3“, some automatically added fields will appear and others that you will need to complete.
Complete the following fields marked in red, as shown in the image:
- In the Display Name field, enter your “Name”.
- In the Description field, enter for example “Work”.
- In the POP Incoming Mail Server will be automatically set to your domain.
In our example, it’s mail.arriendoplaya.cl. Port 995. - In the Security Type field, it will be automatically set to SSL/TLS. Leave it as is.
- In the POP Username field, enter your email username.
- In the POP Password field, enter your email password. If you contracted the service with CEODATA, all this information will be sent to your email.

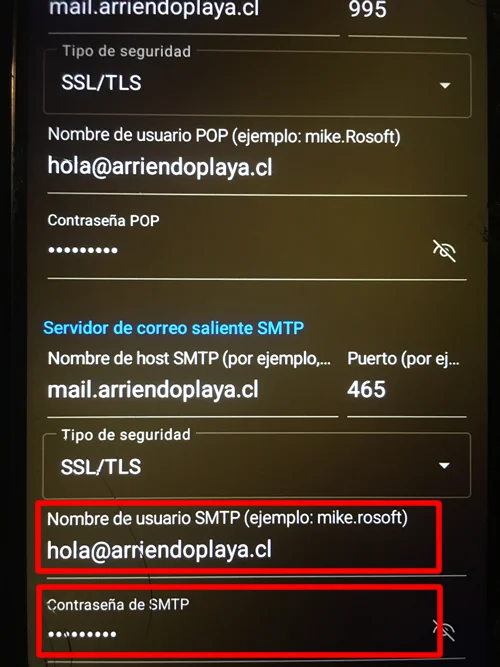
Step 6: Outgoing Mail Configuration
Continuing on the same screen,
- In the SMTP Host Name: field, it will be automatically configured with your domain.
In our example, it is mail.arriendoplaya.cl. Port 465. - In the Security Type field, it will automatically be set to SSL/TLS. Leave it as is.
- In the SMTP Username field, re-enter your email username.
- In the SMTP Password field, re-enter your email password. If you contracted the service with CEODATA, all this information will be sent to your email.
- Once you have completed all the fields, click on the “Victo Bueno” icon on the top right side of your screen.
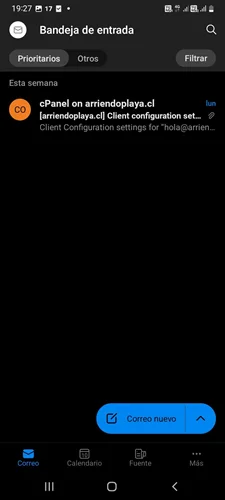
Step 7: Go to your inbox
On the next screen, you’ll see a “Do you want to add another account?” message. Tap on Maybe later if you don’t want to add any more accounts. You’ll then be taken to your inbox. That’s it, you can now start sending and receiving emails on your mobile phone. Remember that to receive alerts for new emails, you’ll need to have the Outlook app open on the inbox screen. You can download the app and leave it in the background and continue using your mobile phone normally.

With these steps completed, you have now completed the “How to configure corporate email with Outlook” guide. Enjoy keeping your corporate emails on your mobile phone and always be up to date with your messages.